Homemade Vanilla Ice Cream
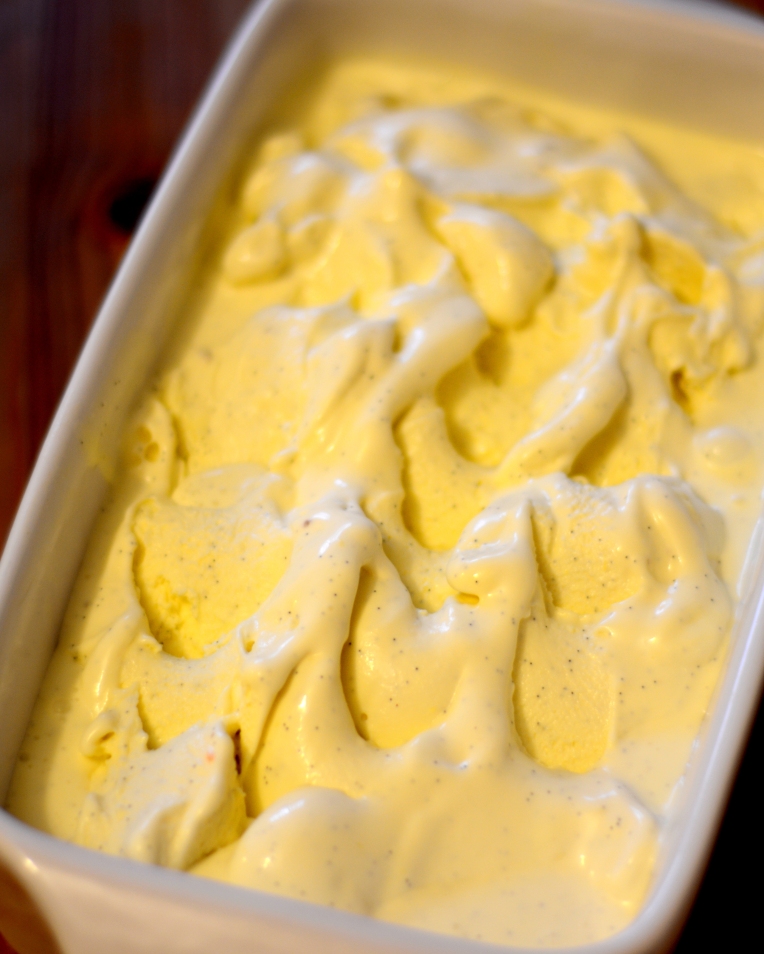
I’m so excited to share this recipe! I recently bought an ice cream maker and really got into ice cream making and tasting, which can truly be one’s entire hobby. It’s so addictive and even therapeutic. There is something meditative about watching custard swirl and slowly change its texture – it’s just so mesmerizing. What’s even better is being able to taste it throughout the process. Making your own ice cream is surprisingly effortless. I love customizing ingredients and flavors to my own taste. For example, I used to make dairy-free ice cream with coconut milk and cream when I couldn’t eat dairy for a couple of months due to my daughter’s allergy. I also love being able to control the amount of sugar as I don’t like my ice cream too sweet. This is by far my very favorite ice cream recipe. So rich and decadent, yet not at all heavy. The recipe is adapted from Melissa Clark’s master ice cream recipe, featured here.
Ingredients (makes about 2 pints)
2 1/2 cups heavy cream
1 1/2 cup 2% milk
1/2 cup sugar
1/8 teaspoon sea salt
6 large egg yolks
2 vanilla beans
Directions
- In a pot, simmer cream, milk, sugar and sea salt, for a few minutes until sugar completely dissolves (do not boil).
- Whisk egg yolks for a few minutes. Add some of the milk and cream mixture to egg yolks and whisk thoroughly. Add the yolk mixture to the pot with the rest of the hot milk and cream, return to heat and cook for a couple of minutes until the mixture thickens enough to cover a spoon inserted into the pot.
- Cut vanilla beans, scrape their sides thoroughly and add seeds and pods into the cream mixture. Refrigerate for at least a few hours, overnight is best.
- Remove vanilla pods from custard and transfer to an ice cream machine. Freeze according to the manufacturer’s instructions, typically for 20 minutes or so. Keep frozen and remove from the freezer 15 minutes before serving. Enjoy!
Fluffy Lemon Buttermilk Pancakes
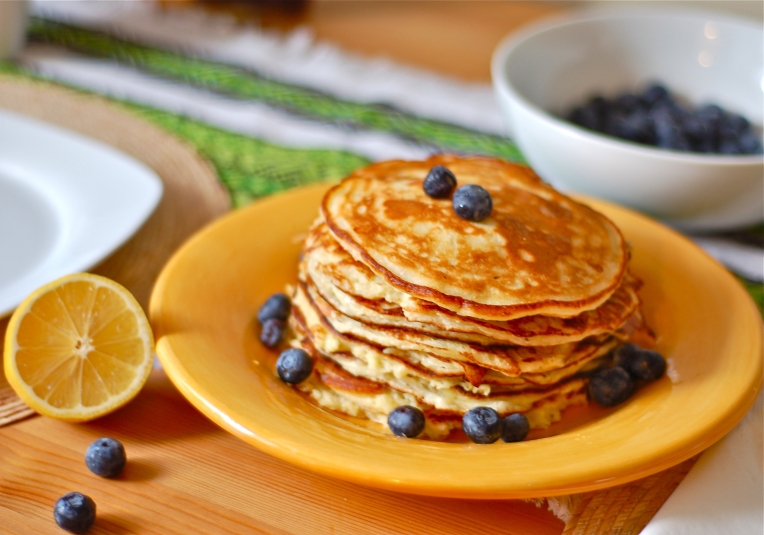
This is probably my favorite pancake recipe that I’ve recently tried. Buttery, fluffy, with a slight hint of lemon flavor, they will really brightened up your morning and set a great mood for the rest of the day! I used slightly modified recipe found here. Instead of buttermilk, I actually used plain kefir. I made the batter the night before as recommended and added about 1/2 cup of 2% milk to it in the morning as it seemed too thick.
Ingredients (for 2-4 servings)
- 2 cups all purpose flour
- ¼ cup sugar
- 2 teaspoons baking powder
- 1 teaspoons baking soda
- 2 eggs, beaten
- 2 cups buttermilk or kefir
- ¼ cup unsalted butter, melted
- ¼ teaspoon salt
- ¼ cup lemon juice, fresh
- 2 tablespoons lemon zest
Directions
1. Make the batter a few hours in advance, ideally, the night before and refrigerate overnight. In a large bowl, combine all the powder ingredients together. In a separate bowl, combine eggs, buttermilk, melted butter, lemon juice and zest and add to the powder ingredients. Stir everything and set aside.
2. Cook pancakes in batches (I used about 1/4 cup of batter per pancake) on medium heat on a slightly greased pan. They’re usually golden brown just under 2-3 minutes per side.
Enjoy!
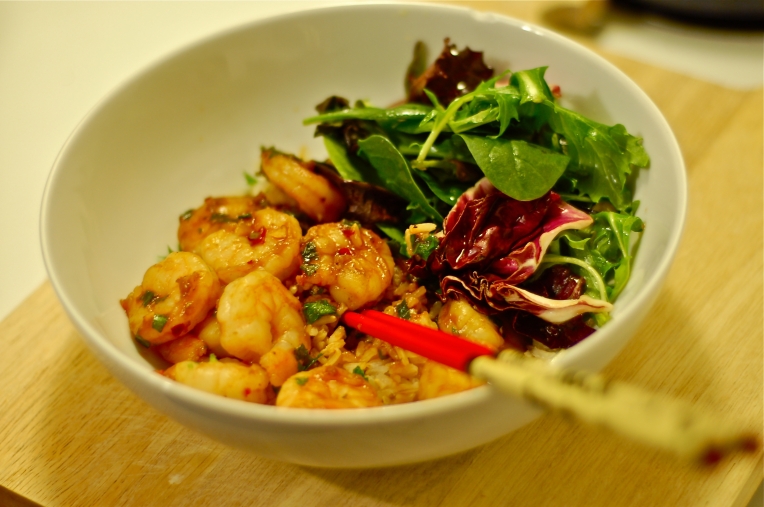
Shrimp Stir Fry with Vegetables
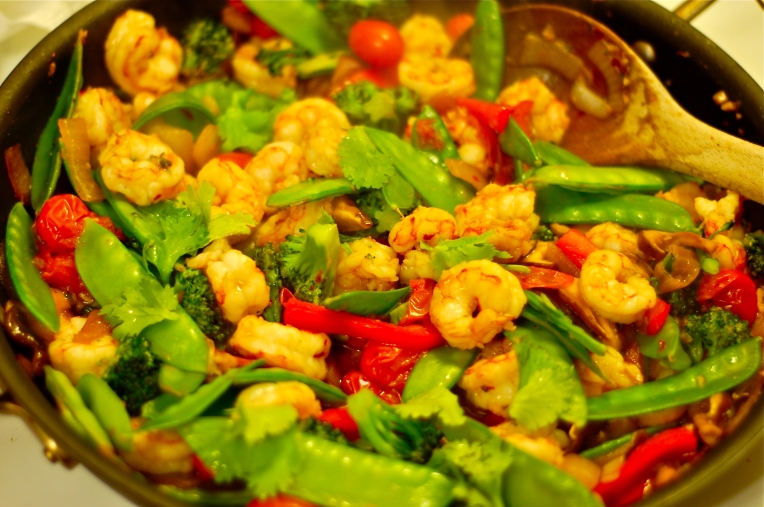
As you noticed, I haven’t been devoting a lot of my time to this blog. Perhaps, because when you’re addicted to gourmet food, you’ll typically have to deal with consequences! I’ve been boring lately, eating healthy and spending time at the gym prepping for the summer season (if it ever gets to New England)!
I know what you’re thinking now but before you unfollow my blog forever, I promise to still post delicious guilty pleasure recipes! I typically indulge over the weekends and still make all the good stuff. As for eating healthy…I’m surprised that a lot of people still associate healthy food with dry and plain chicken breast with a bowl of lettuce with no dressing. There are a variety of dishes that are flavorful and delicious, yet won’t affect your waistline! Stir fry is one of them. It’s been my staple lately just because it’s so versatile. Take the recipe below as just a suggestion for ingredients. You can make it with the veggies you have in your fridge and omit broccoli if you hate it. Hate shrimp? Make it with chicken, beef, fish, scallops, mushrooms or what have you! It’s super quick too. 15 minutes on a Tuesday night and you have a filling healthy dinner? Yes, please. Love this over brown or wild rice! OK, now when you’re convinced (hopefully!), let’s get to the recipe!
Ingredients (for 4 servings)
1-1 1/2 lb. shrimp (peeled and cleaned)
1 cup broccoli florets
2 cups snap peas
1 cup grape tomatoes
1 cup shiitake mushrooms, sliced
1 bell pepper, sliced
1 red onion, sliced thick
4-5 cloves garlic, peeled and chopped finely
3-4 tablespoons stir fry sauce
1 tablespoon soy sauce
1 lime
1 tablespoon coconut oil
Salt, pepper and red chili flakes to taste
Handful of cilantro leaves
-
Heat a wok pan or any large pan on medium/high with coconut oil. I don’t have the wok and just use a large non-stick pan for this.
-
Add onion and garlic to the pan, and cook stirring for about 1 minute. Add bell pepper, mushroom pieces and tomatoes and cook for another 2-3 minutes, stirring occasionally. Add broccoli, soy sauce and about 2 tablespoons of stir fry sauce, cook stirring for another 3-5 minutes. Add shrimp, snap peas and the rest of the stir fry sauce. If you’re making this with chicken or beef, add the meat earlier in the process. Season with salt, black pepper and red chili flakes. Stir well and cook until shrimp is cooked through (about 3 minutes). Squeeze lime juice over the stir fry and garnish with your favorite herbs (I typically use chopped basil, parsley or cilantro). Serve over rice and enjoy!
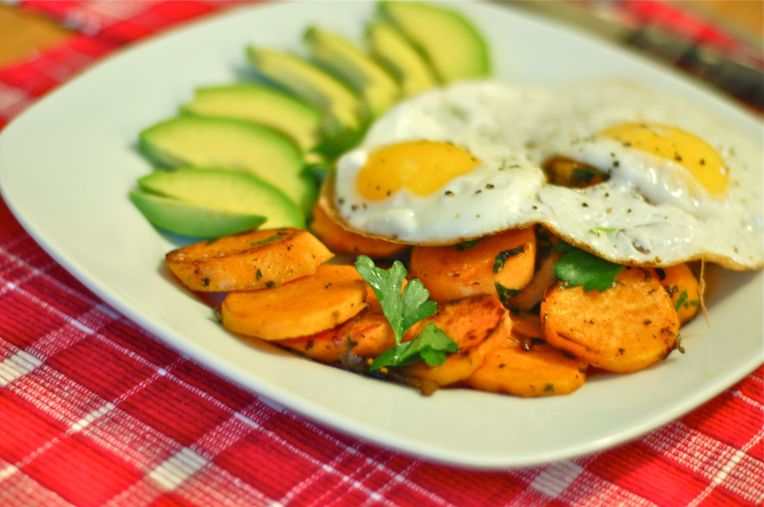
Simple Eggs with Sweet Potato Home Fries
Lately, I’ve been obsessed with sweet potatoes. Not only are they delicious, but they’re also so versatile, easy too cook and loaded with healthy nutrients! I find their flavor much more complex compared to regular potatoes and they make a very tasty and sophisticated side. I typically mash them, adding cottage or ricotta cheese, lemon juice, spices, caramelized onions – you name it!
Today, I’ve tried roasting them on a pan, home fries style and they turned out delicious. Loved them with avocado and sunny side up eggs – try this easy, hearty and balanced meal this weekend!
Ingredients (for 1 serving)
2 small sweet potatoes, peeled and sliced
1 shallot
1/2 and 1/4 tablespoon coconut oil, devided (or any vegetable oil)
2 large eggs
1/2 avocado, sliced
1/2 tablespoon lemon juice
Handful of fresh parsley leaves
Black pepper and salt to taste
1. Heat coconut oil in a small pan on medium, add shallot and sweet potato slices. Season with salt and pepper to taste. Cover the pan and cook stirring occasionally for about 10-15 minutes until the potatoes are completely soft. You may need a few tablespoons of water half way through the process if the vegetables look too dry. I also sprinkle them with a few drops of lemon juice to balance the sweetness.
2. In a separate skillet, heat the remaining vegetable oil and cook the eggs until the desired doneness (is this even a word?!). Season with salt and pepper.
3. Arrange sweet potato fries on a plate, garnish with parsley, lay eggs on top of them and serve immediately with avocado slices.
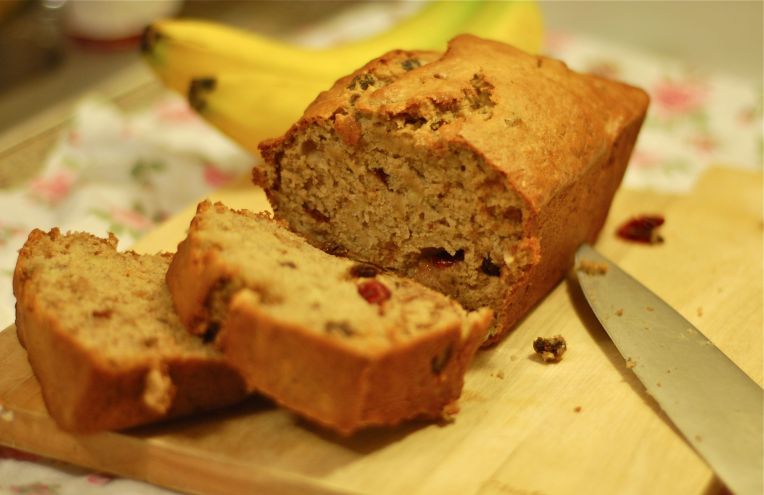
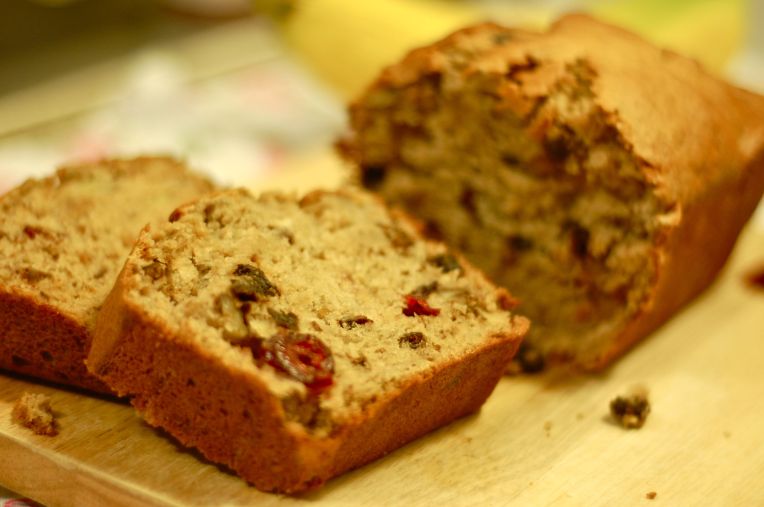
Loaded Banana Bread
Because of the winter storm Nemo, we’ve been snowed in for two days now. I’m actually really enjoying this quiet and lazy time at home! Finally, I have a perfect excuse to be a couch potato all day and catch up on the latest episodes of Downton Abbey, Portlandia and Girls. I know that these shows couldn’t be more different, but I love them all! Ok, I did get a bit of air today too, having to dig the cars out of the piles of snow. So, I thought we needed a sweet reward after all that hard work. Who cares if I barely did some of the shoveling? Even walking through the snow surely burnt a ton of calories!

I’ve never made a banana bread before, but we had a lot of bananas and the recipe seemed easy enough, so I gave it a try. I actually found a few recipes online and combined a few of them. I don’t like plain cakes and breads, so I added raisins, dried cranberries and walnuts to this bread. It turned out so tasty! I could barely wait for it to be done, it smelled so good in the oven. This recipe is definitely a keeper, I hope you’ll enjoy it too!
What do you like to make when you have a lot of spare time on your hands?
Ingredients (for a 9×5 loaf pan)
3 large ripe bananas
3/4 cup sugar
2 eggs
3/4 stick butter, melted
1/4 cup raisins
1/4 cup walnut pieces
1/4 cup dried cranberries
1 1/2 cup flour
1 teaspoon baking powder
1 teaspoon baking soda
1/2 teaspoon cinnamon
1/2 teaspoon salt
1 teaspoon vanilla extract
Directions
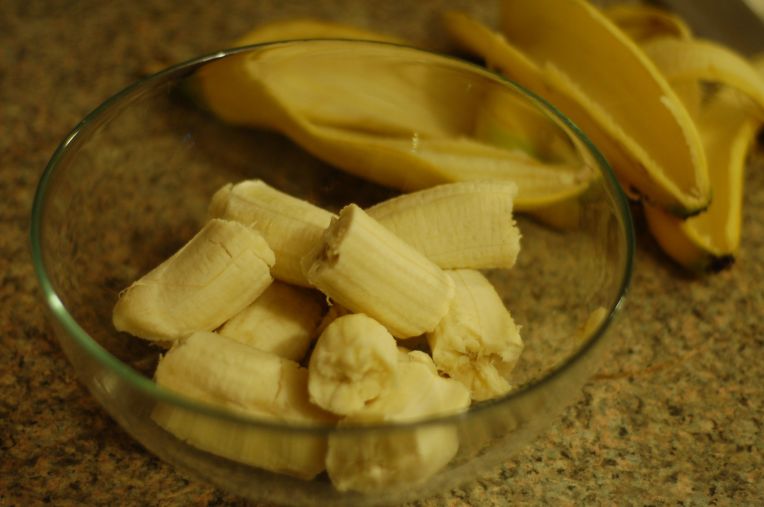
1. Preheat the oven to 350F. In a large bowl, mash bananas with a fork. In a separate bowl, gently whisk eggs and sugar; add melted butter, vanilla extract and cinnamon, and whisk for a few more seconds until smooth. Add the egg mixture to the bowl with bananas, add raisins, walnuts and cranberries and mix with a fork.
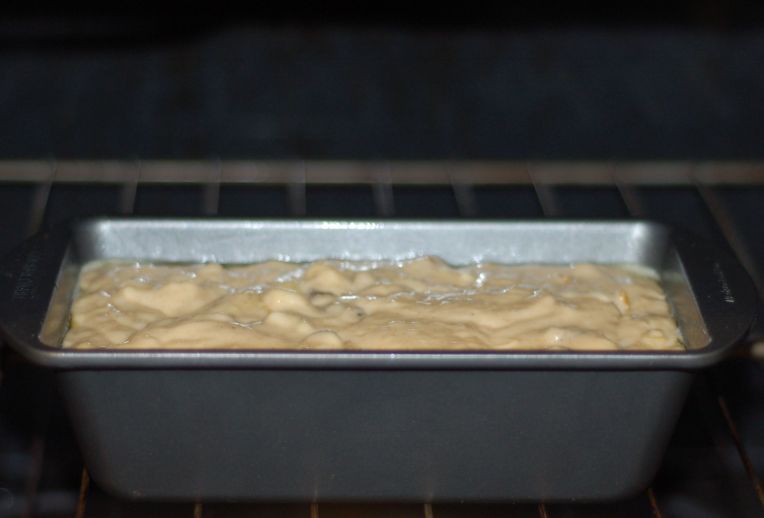
2. In another bowl, mix together flour, salt, baking powder and baking soda. Add the powder mixture to the bowl with banana mixture and mix everything together with the fork until smooth. Transfer to a buttered loaf pan and bake for about 1 hour and 10 minutes until the bread is nicely browned and a toothpick inserted in the center comes out clean. Let it cool for half an hour, transfer to a cutting board or a plate, slice and serve warm.
Sweet and Sour Shrimp
Last week, I stumbled upon this great sweet and sour shrimp recipe in Food & Wine. The simplicity of a sauce has made it for me, even though I’m not usually a big fan of ketchup. Although I just tried the actual recipe with shrimp tonight, I’ve made this sauce a few times now, serving it with juicy rib eye, baked salmon and even over a tuna salad. It goes with pretty much anything! Gotta love these simple ideas for quick weeknight meals that don’t require much effort and time in the kitchen. I adjusted the original recipe – no sugar and cornstarch for me! I also wanted to make it spicy, so I added some red chili flakes.
Ingredients (for 4 servings)
For the shrimp
1 1/2 lb. medium raw shrimp, peeled
1 tablespoon vegetable oil
2 tablespoons grated fresh ginger
1 garlic clove, peeled and minced
Salt
Pepper
For the sauce
2 tablespoons ketchup
2 tablespoons soy sauce
1 tablespoon sweet chili sauce
1 1/2 tablespoon rice vinegar
About 1/3 teaspoon red chili flakes
Directions
-
Whisk all the sauce ingredients in a small bowl – voila, the sauce is done!
-
Heat a skillet until very hot, add vegetable oil and swirl to coat the bottom of the skillet. Add garlic, ginger and shrimp and cook for about 2 minutes, until the shrimp gets pink but not yet cooked through. Add the sauce, stir well and cook for about another minute or two. Season with salt and black pepper to taste. Serve over rice garnishing with your favorite fresh herb!
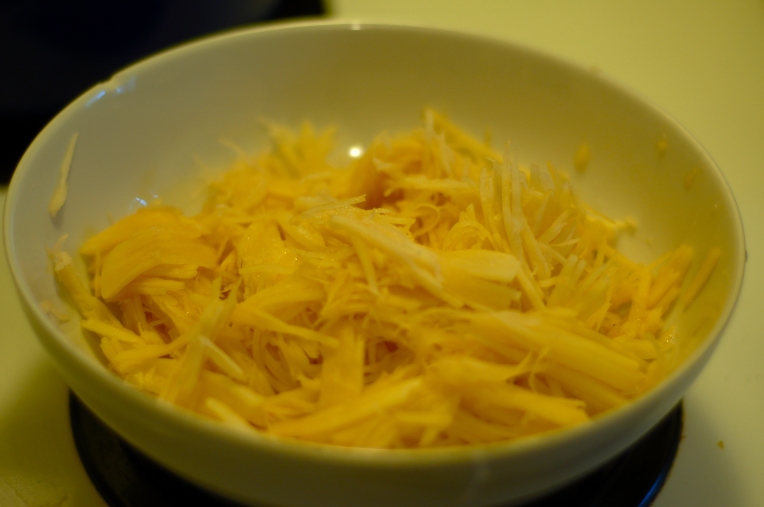
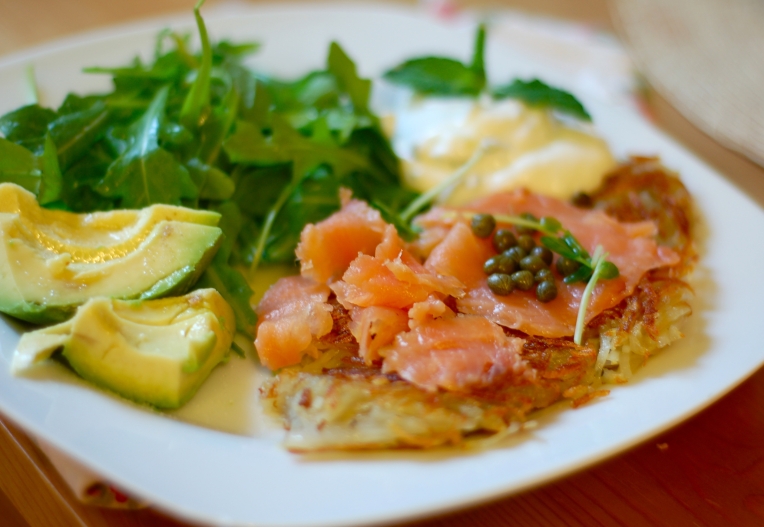
Potato Rosti with Smoked Salmon and Capers

I love breakfast food and am always looking for new breakfast and brunch recipe ideas. Of course, I stick to my favorite oatmeal with fresh fruit and Greek yogurt during the week, but there is nothing better on a weekend than a hearty brunch! When I tried this dish at one of my favorite local tapas places, I knew that it’d make a perfect breakfast! It’s basically a giant potato latke garnished with smoked salmon and capers. What’s not to love, right?! Serve it with some mint yogurt sauce. Delicious!
Ingredients (for 2 servings)
For the rosti
3 large Yukon gold potatoes, peeled
Smoked salmon to taste (about 4 oz.)
1 tablespoon capers
Salt
Pepper
About 2-3 tablespoons canola oil
1 tablespoon butter
For the mint yogurt sauce
1 cup fat-free plain Greek yogurt
Handful of fresh mint leaves, chopped
2 tablespoons olive oil
1 tablespoon lemon juice
Salt
Pepper
Directions
- Make the mint yogurt sauce – mix yogurt with olive oil, lemon juice and fresh mint, season with salt and pepper and set aside.

- Julienne potatoes on a mandoline; if you don’t have a mandoline, you could grate potatoes on a cheese grater. I prefer the texture of the julienned potatoes though for this dish!
- Heat a non-stick skillet on medium, add some canola oil and about half of the butter. Transfer the potato pieces into the skillet and press into the bottom to distribute evenly. Cook for about 8 minutes, lowering the heat if needed to make sure it’s not burning. To turn the rosti to another side, cover it with a plate and turn the skillet upside down. Add more canola oil and butter to the skillet and gently transfer the rosti uncooked side down back to the skillet.

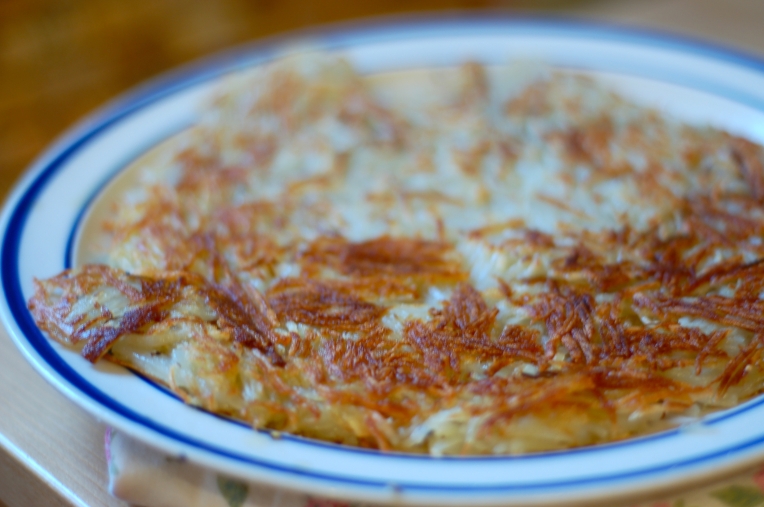
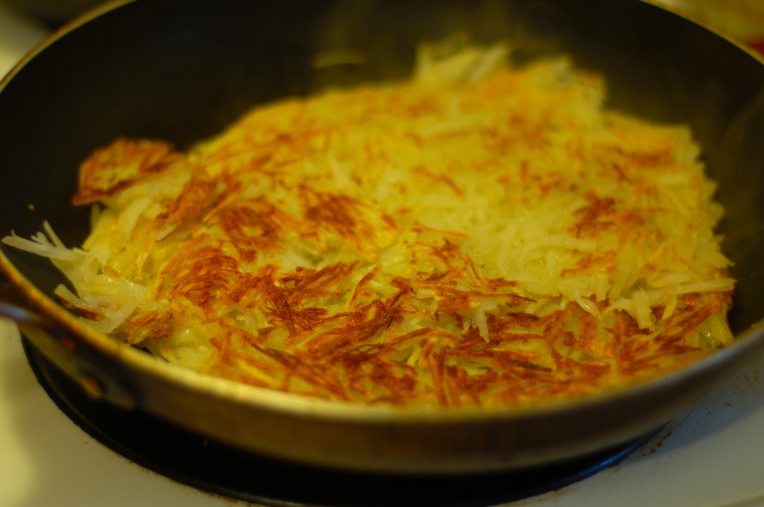
- Cook for another 8 minutes or so until the potato is cooked through. Transfer to a plate, season with salt and pepper and arrange smoked salmon pieces on top. Garnish with capers and fresh herbs and serve immediately with the mint yogurt sauce (optional).
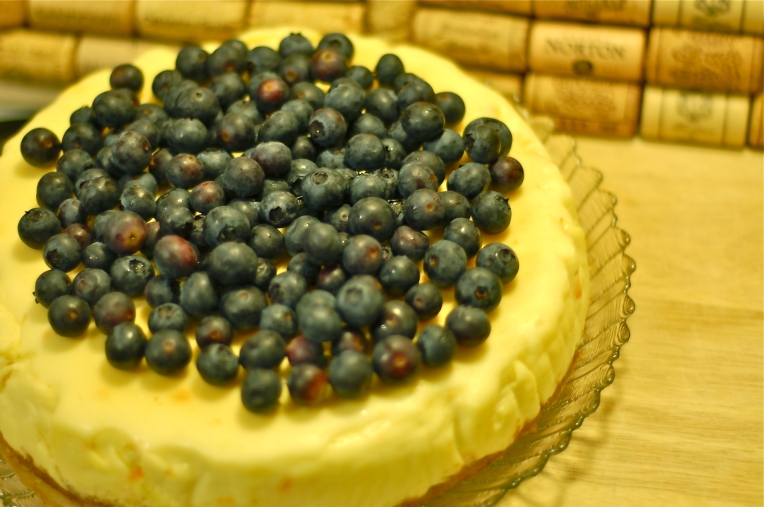
Simply Divine Cheesecake

Merry Christmas to everyone celebrating today and happy holiday season to all of you! I brought this cheesecake to the Christmas Eve dinner at my friends’ house last night. My friend and a fellow food blogger made an incredible meal and the cheesecake was a perfect way to finish off our feast.
Cheesecake is my very favorite dessert. My mom tells me that when I was little, I had my particular way of eating a cake. I’d just pick on cream filling, icing or custard, without touching the actual cake. When I came to the US and tried cheesecake for the first time, it was love at first bite. Cheesecake embodies all that I love in a cake – no cake, just the luscious, creamy filling.
I’ve always thought of cheesecake as a very difficult dessert to make and was surprised how simple it actually is! I’ve tried a few recipes throughout the years, and this one by far is the best. It’s a modified recipe based on this one from Tyler Florence with some tips from Jamie Oliver and Martha Stewart. Don’t be afraid of orange and lemon zest, it adds so much flavor without overpowering this delicate dessert. Baking the cheesecake in boiling water is key. In the past, I’ve tried a recipe that didn’t call for that and while the end result was pretty decent, the cheesecake baked in water is definitely creamier and has that melt-in-your-mouth texture.
Ingredients (for a 10-inch springform pan)
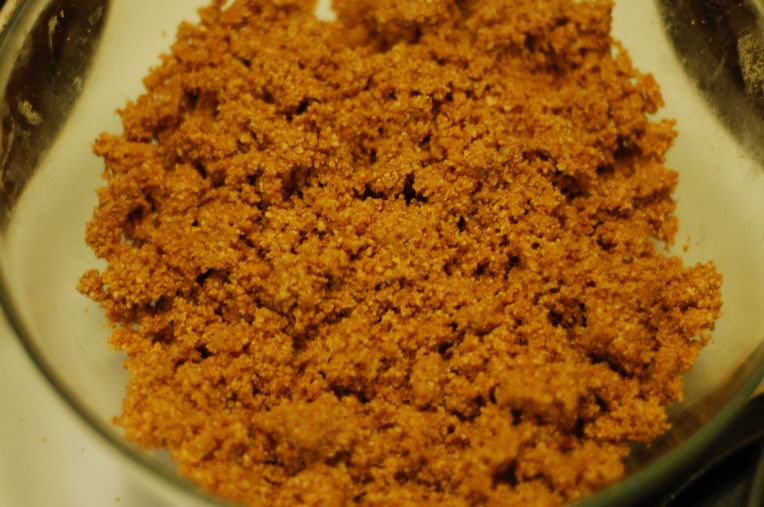
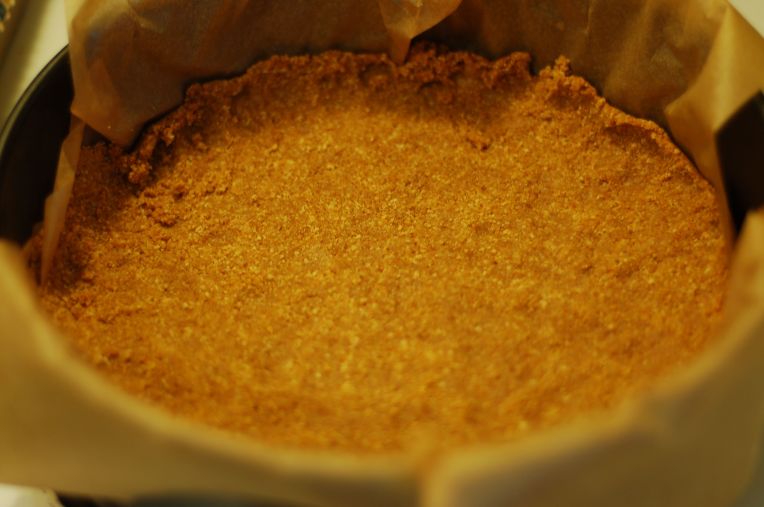
Crust
1 1/2 cup honey graham crackers, ground
1 stick butter, softened
Filling
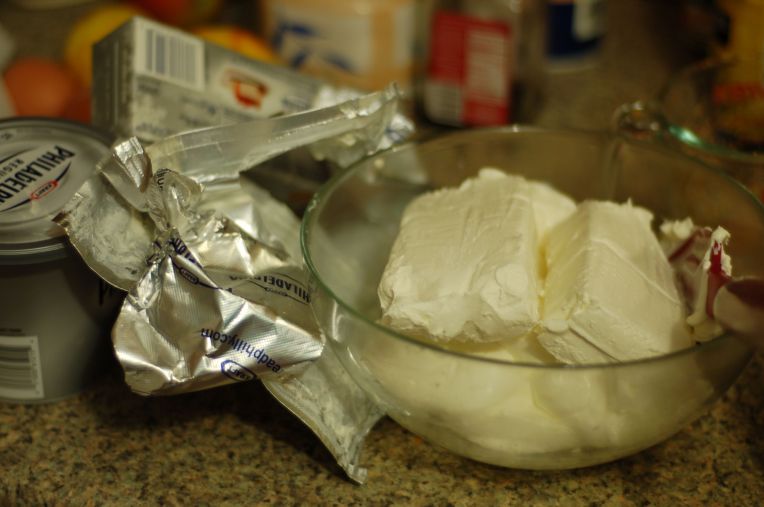
2 lbs. full fat cream cheese (I had 1 lbs. of regular Philadelphia cream cheese spread and 2 8 oz. blocks)
3 eggs
1 cup sugar
Zest of one lemon
Zest of one orange
1 teaspoon vanilla extract
Boiling water (for the baking)
Directions
- Pre-heat the oven to 350F. Make the crust – combine ground graham crackers with the butter and mix well with a fork. Arrange baking paper in a springform pan and spray it with a non-stick cooking spray. Transfer the graham crackers mixture into the pan and press the crumbs down into the base. Refrigerate for 5 minutes.
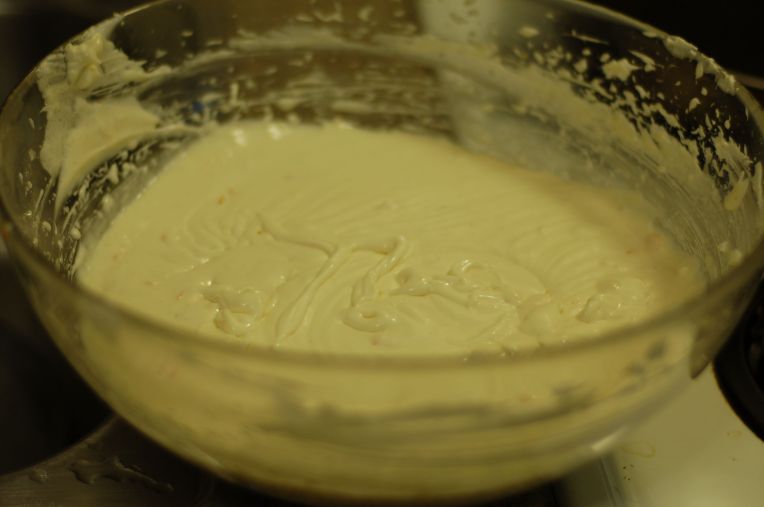
- Make the filling. Beat the cream cheese with a hand mixer for a couple of minutes until smooth. Add eggs one by one and continue beating on slow until smooth. Gradually add sugar, lemon and orange zest, and vanilla extract. Beat until the mixture is smooth and creamy. Refrigerate for 5 minutes. Pour over the crust and smooth with a spatula.
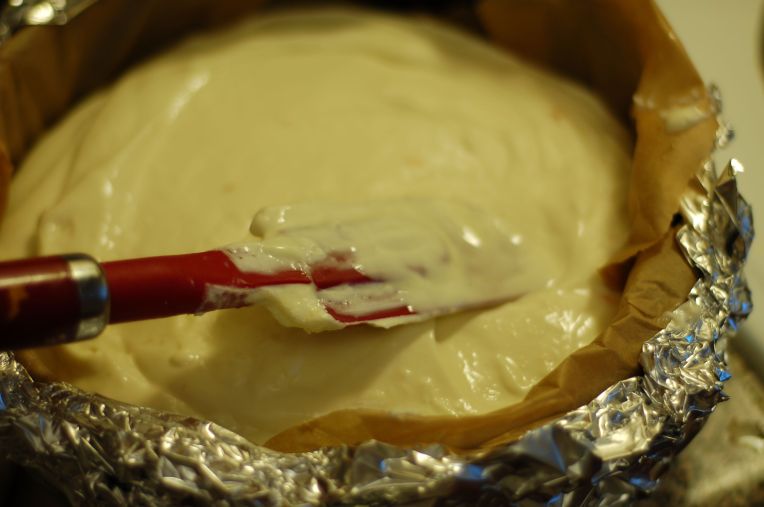
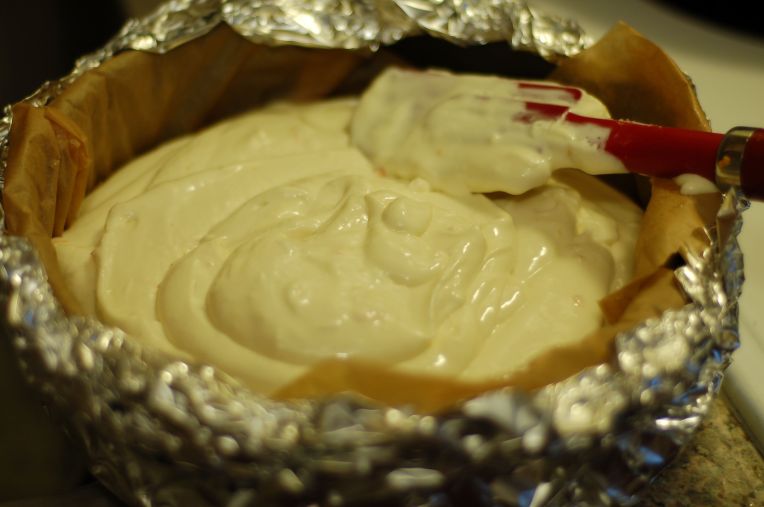
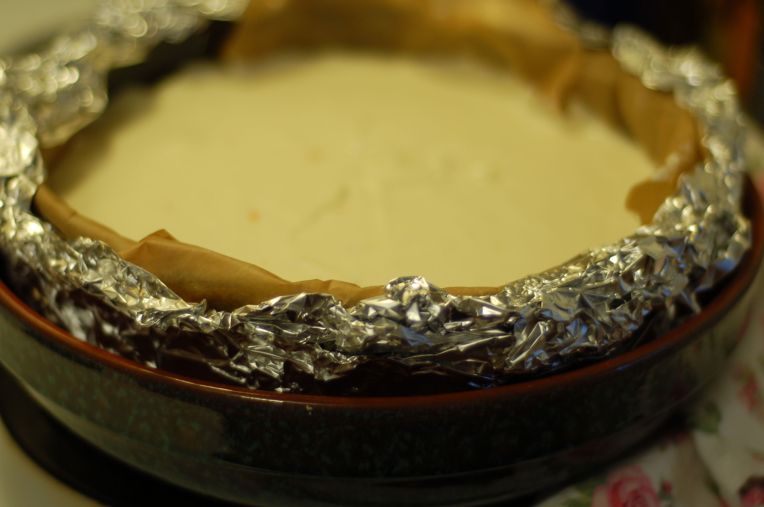
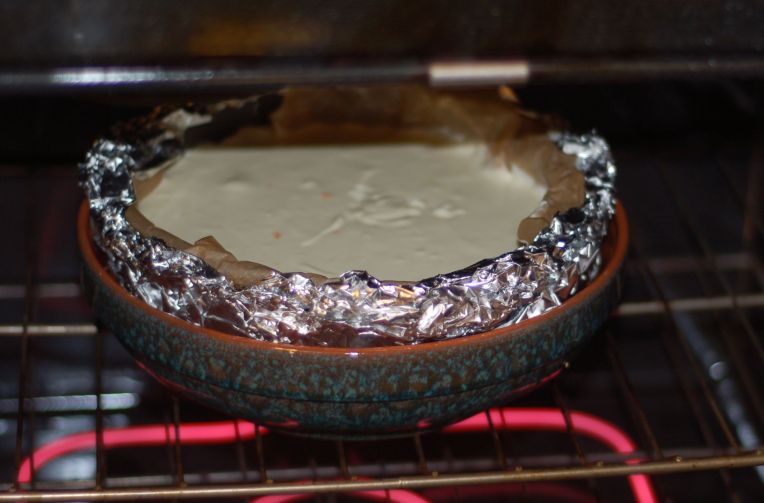
- Set the cheesecake pan on a few pieces of aluminum foil and fold the foil around the sides of the pan. This will prevent the water from getting into the pan. Place the cake pan into a larger roasting dish or pan and fill it with boiling water. Transfer the pans into the oven and bake at 350F for about one hour (depending on your oven) until the cake starts browning a bit on the top. It should still jiggle – don’t overcook it as it will firm up after refrigeration.
- Cool for half and hour and place in the fridge. Refrigerate for at least five hours until completely firm. To cut, dip a knife in hot water after you cut each piece. Serve with your favorite fruit spread or fresh berries, it’s also quite perfect on its own!